Chapter Outline
Chapter 7: Sentiment Analysis
So far, you’ve built:
- Feedback collection (Airtable, Giscus/Disqus, your own API).
- Analytics dashboards (summary stats, charts).
But raw comments can still be overwhelming. Instead of manually reading hundreds of comments, we can use sentiment analysis to classify them automatically as:
- Positive (“This tutorial was great!”)
- Negative (“I got stuck and couldn’t follow this.”)
- Neutral (“I tried this on FastAPI version 0.95.”)
In this chapter, we’ll:
- Learn about sentiment analysis basics.
- Build sentiment endpoints in FastAPI and NestJS.
- Grow with a dashboard view that displays aggregated sentiment.
7.1 Sentiment Analysis in Practice
Why it matters:
- Quickly detect problematic posts (lots of negative feedback).
- Identify high-impact content (lots of positive feedback).
- Prioritize improvements without manual triage.
Approaches:
- Rule-based (lexicons like VADER in Python).
- ML models (pre-trained Hugging Face pipelines).
- Custom fine-tuned models (advanced, out of scope here).
7.2 FastAPI Sentiment API
We’ll use Hugging Face transformers for a modern, out-of-the-box solution.
7.2.1 Install Dependencies
We are using a combination of PyTorch with the Hugging Face Transformers library. PyTorch is a deep-learning library, similar to TensorFLow, and Flax.
bashpip install transformers torch
7.2.2 Sentiment Service
app/sentiment.py1from fastapi import APIRouter, Depends2from sqlalchemy.orm import Session3from transformers import pipeline4from app.main import get_db5from app.models import Feedback67router = APIRouter()8sentiment_model = pipeline("sentiment-analysis")910@router.get("/analytics/sentiment")11def sentiment_summary(db: Session = Depends(get_db)):12 comments = db.query(Feedback.comment).filter(Feedback.comment.isnot(None)).all()13 results = {"positive": 0, "negative": 0, "neutral": 0}1415 for (comment,) in comments:16 if not comment.strip():17 continue18 pred = sentiment_model(comment[:512])[0] # truncate to 512 chars19 label = pred["label"].lower()20 if "pos" in label:21 results["positive"] += 122 elif "neg" in label:23 results["negative"] += 124 else:25 results["neutral"] += 126 return results
The code above uses a sentiment-analysis task pipeline, using the default model and tokenizer. We are not applying any additional customizations on this pipeline, such as finetuning. We discuss the usage of various HuggingFace Transformer models, their customization, deep-learning frameworks (PyTorch, TensorFlow, etc.), and tools such as LangChain in a separate tutorial series pertaining to developing AI applications.
For now the defaults will suffice.
Register in app/main.py:
pythonfrom app import sentimentapp.include_router(sentiment.router)
7.3 NestJS Sentiment API
For Node.js we’ll use Hugging Face Inference API (instead of running big models locally).
7.3.1 Install Axios
bashnpm install axios
7.3.2 Sentiment Service (Hugging Face API)
src/feedback/feedback.sentiment.service.ts1import { Injectable } from '@nestjs/common';2import axios from 'axios';3import { InjectRepository } from '@nestjs/typeorm';4import { Repository } from 'typeorm';5import { Feedback } from './feedback.entity';67@Injectable()8export class FeedbackSentimentService {9 constructor(10 @InjectRepository(Feedback) private repo: Repository<Feedback>,11 ) {}1213 async analyze() {14 const comments = await this.repo15 .createQueryBuilder('f')16 .select('f.comment')17 .where('f.comment IS NOT NULL')18 .getRawMany();1920 const results = { positive: 0, negative: 0, neutral: 0 };2122 for (const row of comments) {23 if (!row.f_comment?.trim()) continue;24 const res = await axios.post(25 'https://api-inference.huggingface.co/models/distilbert-base-uncased-finetuned-sst-2-english',26 row.f_comment,27 { headers: { Authorization: `Bearer ${process.env.HF_API_KEY}` } },28 );29 const label = res.data[0].label.toLowerCase();30 if (label.includes('pos')) results.positive++;31 else if (label.includes('neg')) results.negative++;32 else results.neutral++;33 }3435 return results;36 }37}
7.3.3 Sentiment Controller
src/feedback/feedback.sentiment.controller.ts1import { Controller, Get } from '@nestjs/common';2import { FeedbackSentimentService } from './feedback.sentiment.service';34@Controller('analytics')5export class FeedbackSentimentController {6 constructor(private readonly service: FeedbackSentimentService) {}78 @Get('sentiment')9 analyze() {10 return this.service.analyze();11 }12}
7.4 Sentiment Dashboard
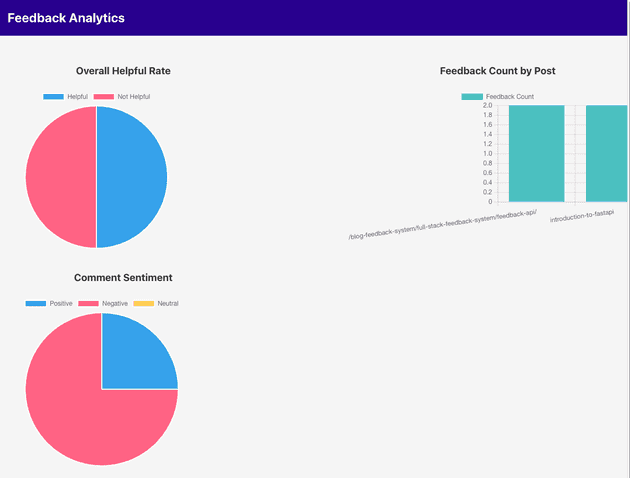
We’ll extend our React dashboard (from Chapter 6) to visualize sentiment.
src/components/SentimentChart.tsx1import React, { useEffect, useState } from 'react';2import { Pie } from 'react-chartjs-2';34export const SentimentChart: React.FC<{ apiUrl: string }> = ({ apiUrl }) => {5 const [data, setData] = useState<any>(null);67 useEffect(() => {8 fetch(`${apiUrl}/analytics/sentiment`).then(res => res.json()).then(setData);9 }, [apiUrl]);1011 if (!data) return <p>Loading sentiment...</p>;1213 return (14 <div>15 <h3>Comment Sentiment</h3>16 <Pie17 data={{18 labels: ['Positive', 'Negative', 'Neutral'],19 datasets: [20 {21 data: [data.positive, data.negative, data.neutral],22 backgroundColor: ['#36A2EB', '#FF6384', '#FFCE56'],23 },24 ],25 }}26 />27 </div>28 );29};
Usage in AnalyticsDashboad:
tsx<SentimentChart apiUrl={apiUrl} />
The following is a demonstration of the updated analytics dashboard.

7.5 Use Case Example
- A blog post on “Python Metaclasses” gets 30 comments.
- Sentiment analysis shows 20 negative comments (“hard to follow,” “too advanced”).
- You now know this post needs rewriting or splitting into beginner + advanced versions.
7.6 Summary
In this chapter, you:
- Learned why sentiment analysis matters for feedback.
- Built sentiment endpoints in FastAPI and NestJS.
- Extended the React dashboard with a sentiment chart.
Now you’re not just collecting feedback — you’re extracting meaning from it.
7.7 Exercise
- Add a
/analytics/sentimentendpoint in your backend. - Integrate the SentimentChart into your dashboard.
- Submit a few test comments:
- “This was fantastic!” → should be Positive.
- “I couldn’t understand anything.” → should be Negative.
- “Installed FastAPI 0.97 today.” → likely Neutral.
- Confirm the chart updates correctly.
7.8 Next Step
In the final chapter, we’ll reflect on the journey:
- From prototype → hybrid → full-stack → analytics + ML.
- Lessons learned about tradeoffs.
- How feedback systems tie back to the idea of “writing as learning.”